About the Project
I built this project to get hands-on with the tools I’d actually use in a DevOps role. It’s a three-tier quiz application: React frontend, Flask backend, and PostgreSQL on RDS, all running on AWS EKS.
What makes this interesting (to me at least) is the clean separation between infrastructure and application using the App of Apps pattern. Terraform manages the infrastructure (VPC, EKS, RDS, ECR, IAM roles) and installs ArgoCD. Then, a single kubectl apply bootstraps the entire GitOps workflow via a root Application. That root Application manages everything else - platform tools (ALB Controller, External Secrets Operator, Prometheus) and the actual application workloads - using sync waves to ensure correct deployment order.
The flow is: Terraform → kubectl apply → Root App → Platform Apps → Workloads. This is a production-grade GitOps architecture where Terraform creates the infrastructure and the “GitOps engine” (ArgoCD), then steps back and lets GitOps drive everything else.
I also use External Secrets Operator to sync secrets from AWS Secrets Manager to Kubernetes. This means no secrets in Git, and no manual secret management. Everything is automated and secure.
For CI/CD, I went with GitHub Actions using OIDC to authenticate with AWS. No long-lived credentials sitting in GitHub Secrets. ArgoCD handles the GitOps side, so any changes to the Kubernetes manifests get synced automatically. And I’ve got Prometheus/Grafana for monitoring because you can’t improve what you can’t measure.
If you want to see the code, it’s all on GitHub.
Architecture & Design Decisions
Let me explain why I made certain choices. Some were obvious, others I learnt the hard way.
Why Terraform for Everything?
I actually started with eksctl for the cluster. Seemed easier at first. But then I had infrastructure in two places: some in eksctl YAML, some in Terraform. It got confusing fast.
Moving everything to Terraform meant one source of truth. The VPC, EKS cluster, RDS, ECR repos, IAM roles, all defined in one place. Now I can spin up the whole environment with terraform apply and tear it down with terraform destroy. No more “oh crap I forgot to delete that security group” moments.
Why Managed Node Groups?
EKS gives you three compute options: self-managed nodes, managed node groups, or Fargate.
I picked managed node groups because they hit the sweet spot. AWS handles the boring stuff: AMI updates, node lifecycle, patching. But I still control instance types and scaling.
Fargate would be simpler (no nodes to manage at all) but it costs more for sustained workloads. Self-managed nodes give you full control but that’s overkill for this project. I don’t want to be SSHing into nodes to update packages.
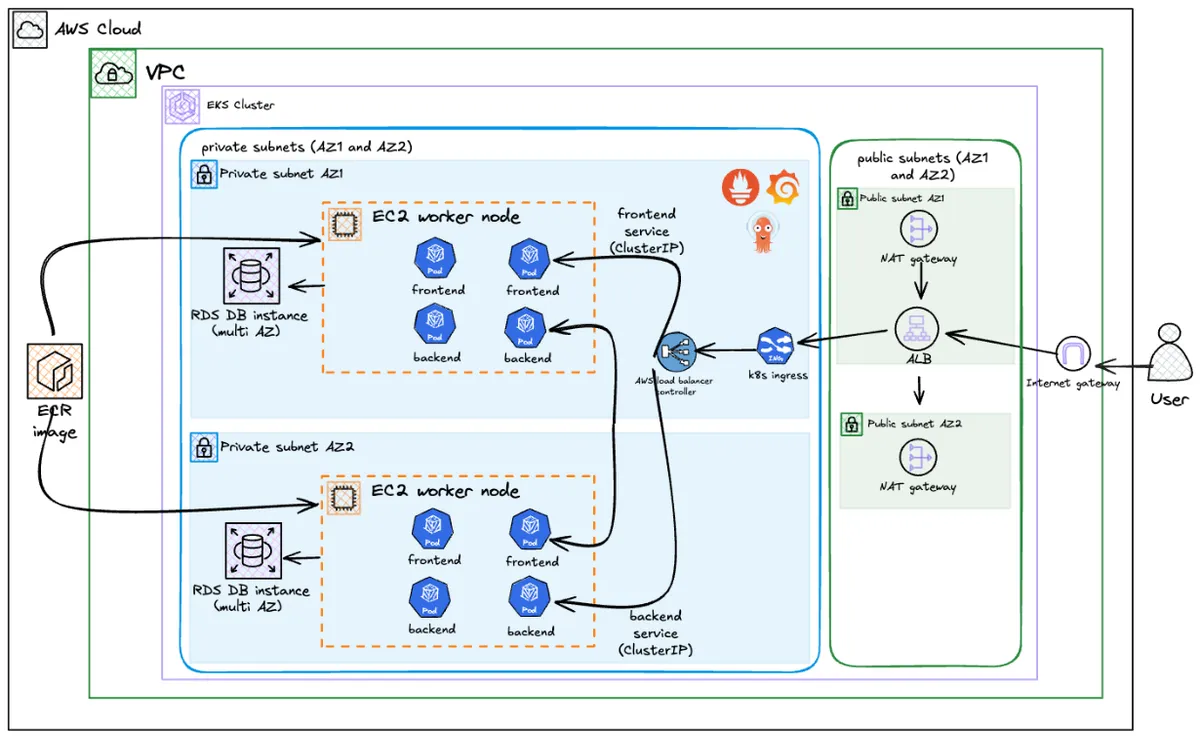
How It All Connects
The journey of a request:
- User hits the ALB (sitting in a public subnet)
- Ingress Controller routes
/apicalls to the backend, everything else to the frontend - Application Layer React serves the UI, Flask handles the API
- Data Layer RDS PostgreSQL tucked away in isolated database subnets, only accessible from the EKS nodes
Prerequisites
You will need aws cli, kubectl, terraform, and docker installed locally. I am assuming you have basic familiarity with Kubernetes and AWS.
Cloning the Repository
git clone https://github.com/wegoagain-dev/3-tier-eks.gitcd 3-tier-eksStep 1: Understanding the Terraform Structure
Heads up on costs: This setup will run you about $190-200/month if you leave it running.
Component What it is Monthly Cost EKS Control Plane The Kubernetes master ~$73 EC2 Nodes (2x) t3.medium instances ~$60 RDS PostgreSQL db.t3.micro database ~$13 NAT Gateway So private subnets can reach the internet ~$32 ALB Load balancer ~$16 Total ~$194/month Based on eu-west-2 (London) pricing. Don’t forget to
terraform destroywhen you’re done experimenting!
The terraform/ directory contains all the infrastructure code:
terraform/├── provider.tf # AWS and Helm providers + S3 backend├── variables.tf # All configurable values├── vpc.tf # VPC with public, private, and database subnets├── eks.tf # EKS cluster using terraform-aws-modules├── rds.tf # PostgreSQL RDS in database subnets├── external_secrets.tf # IAM role for External Secrets Operator (IRSA)├── lb_controller.tf # IAM role for AWS Load Balancer Controller (IRSA)├── argocd.tf # ArgoCD installation via Helm├── ecr.tf # ECR repositories for frontend and backend├── github_oidc.tf # OIDC provider for GitHub Actions└── outputs.tf # Useful outputs like RDS endpointNotice what’s missing: Terraform doesn’t install Helm charts for platform tools directly. Instead, it creates ArgoCD, then you bootstrap GitOps with one kubectl command. The root Application then manages all platform tools via the k8s/platform/ directory. This is the App of Apps pattern - Terraform bootstraps GitOps, then GitOps takes over.
The VPC Setup
I use the terraform-aws-modules/vpc/aws module to create a proper network layout:
module "vpc" { source = "terraform-aws-modules/vpc/aws" version = "~> 5.1.0"
name = var.cluster_name cidr = var.vpc_cidr
azs = var.azs public_subnets = var.public_subnets private_subnets = var.private_subnets database_subnets = var.database_subnets
enable_nat_gateway = true single_nat_gateway = true # Saves money for dev environments
enable_dns_hostnames = true enable_dns_support = true
# Tags required for EKS to discover subnets public_subnet_tags = { "kubernetes.io/role/elb" = "1" } private_subnet_tags = { "kubernetes.io/role/internal-elb" = "1" }}The key bit here is the three tier subnet layout:
- Public subnets: Where the ALB lives
- Private subnets: Where the EKS nodes run (they get internet access via NAT Gateway)
- Database subnets: Completely isolated, no internet access at all
The EKS Cluster
The EKS module handles all the heavy lifting:
module "eks" { source = "terraform-aws-modules/eks/aws" version = "~> 19.0"
cluster_name = var.cluster_name cluster_version = "1.31"
vpc_id = module.vpc.vpc_id subnet_ids = module.vpc.private_subnets
eks_managed_node_groups = { standard-workers = { instance_types = ["t3.medium"] min_size = 1 max_size = 3 desired_size = 2
iam_role_additional_policies = { AmazonEKSWorkerNodePolicy = "arn:aws:iam::aws:policy/AmazonEKSWorkerNodePolicy" AmazonEKS_CNI_Policy = "arn:aws:iam::aws:policy/AmazonEKS_CNI_Policy" AmazonEC2ContainerRegistryReadOnly = "arn:aws:iam::aws:policy/AmazonEC2ContainerRegistryReadOnly" CloudWatchAgentServerPolicy = "arn:aws:iam::aws:policy/CloudWatchAgentServerPolicy" } } }
enable_irsa = true cluster_endpoint_public_access = true}The enable_irsa = true is important. This sets up an OIDC provider for the cluster, which lets Kubernetes ServiceAccounts assume IAM roles. The AWS Load Balancer Controller and External Secrets Operator need this to access AWS services.
Step 2: Understanding OIDC and IRSA
This is where things get interesting. Two different OIDC providers, two different purposes, both working together to eliminate hardcoded credentials.
What is OIDC?
OIDC (OpenID Connect) is an authentication protocol built on top of OAuth 2.0. It allows systems to verify identity via signed tokens without sharing passwords. In AWS, OIDC providers let you authenticate with AWS services using tokens from external identity providers.
The Two OIDC Providers in This Setup
1. GitHub OIDC Provider (for CI/CD Authentication)
This lets GitHub Actions authenticate with AWS without storing long-lived credentials in GitHub Secrets.
How it works:
- GitHub Actions requests a JWT token from GitHub’s OIDC provider
- Sends token to AWS STS (Security Token Service)
- AWS validates token against your OIDC provider
- Returns temporary AWS credentials (valid for 1 hour)
- Actions uses credentials to push to ECR
The Terraform setup:
resource "aws_iam_openid_connect_provider" "github" { url = "https://token.actions.githubusercontent.com" client_id_list = ["sts.amazonaws.com"] thumbprint_list = ["6938fd4d98bab03faadb97b34396831e3780aea1"]}
resource "aws_iam_role" "github_actions" { name = "GitHubActionsECR"
assume_role_policy = jsonencode({ Version = "2012-10-17" Statement = [{ Action = "sts:AssumeRoleWithWebIdentity" Effect = "Allow" Principal = { Federated = aws_iam_openid_connect_provider.github.arn } Condition = { StringLike = { "token.actions.githubusercontent.com:sub" = "repo:${var.github_repo}:*" } } }] })}The trust policy says: “Only GitHub Actions workflows from my specific repo can assume this role.”
2. EKS OIDC Provider (for IRSA)
This is created automatically when you set enable_irsa = true. It allows Kubernetes pods to assume IAM roles using their ServiceAccounts.
IRSA (IAM Roles for Service Accounts) is an EKS feature that uses OIDC to give pods AWS permissions without giving those permissions to the entire node.
How IRSA Works (The Full Flow)
Without IRSA, you’d have to give the EC2 nodes broad IAM permissions, and every pod on those nodes would inherit those permissions. That’s a security nightmare - your quiz app pods shouldn’t be able to create load balancers!
With IRSA, each pod only gets the permissions attached to its specific ServiceAccount.
The complete flow:
1. Terraform creates IAM role with trust policy ↓2. Trust policy specifies: "Only pods with ServiceAccount X can assume me" ↓3. ArgoCD creates ServiceAccount with annotation: eks.amazonaws.com/role-arn ↓4. Pod starts using that ServiceAccount ↓5. EKS injects OIDC token (JWT) into pod at /var/run/secrets/eks.amazonaws.com/serviceaccount/token ↓6. AWS SDK in pod reads token and sends to STS: "I want to assume role Y" ↓7. STS validates: "Is this token signed by my trusted OIDC provider? Does the subject match?" ↓8. STS returns temporary AWS credentials (valid for 1 hour) ↓9. Pod uses credentials to make AWS API callsConcrete Example: External Secrets Operator
1. Terraform creates the IAM role:
resource "aws_iam_role" "external_secrets" { name = "devops-quiz-external-secrets-role"
assume_role_policy = jsonencode({ Version = "2012-10-17" Statement = [{ Effect = "Allow" Principal = { Federated = module.eks.oidc_provider_arn # EKS OIDC provider } Action = "sts:AssumeRoleWithWebIdentity" Condition = { StringEquals = { # Only this specific ServiceAccount can assume the role "${module.eks.oidc_provider}:sub" = "system:serviceaccount:external-secrets:external-secrets" } } }] })}
# Attach policy to read Secrets Managerresource "aws_iam_role_policy" "external_secrets" { name = "external-secrets-policy" role = aws_iam_role.external_secrets.id
policy = jsonencode({ Version = "2012-10-17" Statement = [{ Effect = "Allow" Action = [ "secretsmanager:GetSecretValue", "secretsmanager:DescribeSecret" ] Resource = aws_secretsmanager_secret.db_credentials.arn }] })}Notice: Terraform creates the IAM role with the trust policy, but doesn’t create the Kubernetes ServiceAccount. The role ARN is hardcoded in the GitOps manifest.
2. ArgoCD installs ESO with ServiceAccount annotation:
serviceAccount: create: true name: external-secrets annotations: eks.amazonaws.com/role-arn: arn:aws:iam::373317459404:role/devops-quiz-external-secrets-role3. When ESO pod starts:
- EKS sees the ServiceAccount annotation
- EKS injects the OIDC token into the pod
- ESO AWS SDK reads the token
- Sends to STS to assume the role
- Gets temporary credentials
- Uses credentials to read from Secrets Manager
Why this matters: The ALB Controller can create ALBs because it has that specific IAM role. My backend pods can’t create ALBs because their ServiceAccount doesn’t have those permissions. Principle of least privilege, automated.
Summary: OIDC vs IRSA
| Concept | What It Is | Used For |
|---|---|---|
| OIDC | Authentication protocol | Proves identity via signed tokens |
| GitHub OIDC | OIDC provider for GitHub | CI/CD pipeline auth to AWS |
| EKS OIDC | OIDC provider for EKS cluster | Pod authentication to AWS |
| IRSA | EKS feature using EKS OIDC | Allows pods to assume IAM roles |
Step 3: The Database Layer
The RDS instance sits in the database subnets with a security group that only allows traffic from the EKS nodes:
resource "aws_security_group" "rds" { name = "${var.cluster_name}-rds-sg" vpc_id = module.vpc.vpc_id
ingress { from_port = 5432 to_port = 5432 protocol = "tcp" security_groups = [module.eks.node_security_group_id] }}
resource "aws_db_instance" "db" { allocated_storage = 20 engine = "postgres" engine_version = "16.8" instance_class = var.db_instance_class db_name = var.db_name username = var.db_username password = random_password.password.result db_subnet_group_name = aws_db_subnet_group.rds.name vpc_security_group_ids = [aws_security_group.rds.id] skip_final_snapshot = true}The password is generated using random_password and stored in AWS Secrets Manager. No hardcoded credentials floating about.
External Secrets Operator: GitOps for Secrets
I used to have Terraform create Kubernetes secrets directly, but that’s problematic for GitOps. If ArgoCD manages your app, but Terraform creates the secrets, you have two sources of truth. Plus, storing secrets in Terraform state isn’t ideal.
External Secrets Operator (ESO) syncs secrets from AWS Secrets Manager to Kubernetes automatically. Here’s how it works:
1. Terraform stores the secret in AWS Secrets Manager:
resource "aws_secretsmanager_secret" "db_credentials" { name = "devops_quiz_db_secret"}
resource "aws_secretsmanager_secret_version" "db_credentials_version" { secret_id = aws_secretsmanager_secret.db_credentials.id secret_string = jsonencode({ DATABASE_URL = "postgresql://${var.db_username}:${random_password.password.result}@${aws_db_instance.db.address}:5432/${var.db_name}" RDS_ENDPOINT = aws_db_instance.db.address })}2. Terraform creates the IAM role for IRSA:
resource "aws_iam_role" "external_secrets" { name = "devops-quiz-external-secrets-role"
assume_role_policy = jsonencode({ # Trust policy allows only the ESO ServiceAccount to assume this role Version = "2012-10-17" Statement = [{ Effect = "Allow" Principal = { Federated = module.eks.oidc_provider_arn } Action = "sts:AssumeRoleWithWebIdentity" Condition = { StringEquals = { "${module.eks.oidc_provider}:sub" = "system:serviceaccount:external-secrets:external-secrets" } } }] })}Notice: Terraform creates the IAM role, but not the Helm chart. The role ARN gets hardcoded in the GitOps manifest.
3. ArgoCD installs ESO via the root Application:
The k8s/platform/external-secrets-chart.yaml Application installs ESO with the ServiceAccount annotation:
serviceAccount: create: true name: external-secrets annotations: eks.amazonaws.com/role-arn: arn:aws:iam::373317459404:role/devops-quiz-external-secrets-role4. ArgoCD deploys the ClusterSecretStore and ExternalSecrets (in k8s/apps/external-secrets.yaml):
# ClusterSecretStore tells ESO how to connect to AWSapiVersion: external-secrets.io/v1kind: ClusterSecretStoremetadata: name: aws-secrets-managerspec: provider: aws: service: SecretsManager region: eu-west-2 auth: jwt: serviceAccountRef: name: external-secrets namespace: external-secrets
---# ExternalSecret fetches the secret from AWSapiVersion: external-secrets.io/v1kind: ExternalSecretmetadata: name: database-secret namespace: 3-tier-app-eksspec: refreshInterval: 1h secretStoreRef: name: aws-secrets-manager kind: ClusterSecretStore target: name: database-secret data: - secretKey: DATABASE_URL remoteRef: key: devops_quiz_db_secret property: DATABASE_URLNow the secret flows: AWS Secrets Manager → ESO → Kubernetes Secret → Pod. No secrets in Git, no secrets in Terraform state, and ArgoCD manages everything.
Sync-Wave Annotations: Controlling Deployment Order
When you have resources that depend on each other, you need to control the order they deploy. ArgoCD has sync-waves for this:
# Wave -1: Secrets must be created before Deployments can use themapiVersion: external-secrets.io/v1kind: ExternalSecretmetadata: name: database-secret annotations: argocd.argoproj.io/sync-wave: "-1"ArgoCD deploys from lowest wave number to highest. This ensures the namespace exists before ExternalSecrets, and secrets exist before Deployments try to mount them.
The Kubernetes Bridge
The initContainers in the backend and migration job use the RDS endpoint from the secret to wait for the database:
initContainers: - name: wait-for-db image: busybox command: ["sh", "-c", 'until nc -z -v -w30 $RDS_ENDPOINT 5432; do echo "waiting for DB.."; sleep 2; done;'] env: - name: RDS_ENDPOINT valueFrom: secretKeyRef: name: rds-endpoint-secret key: RDS_ENDPOINTThis is cleaner than hardcoding the endpoint. If RDS ever changes, the secret updates automatically, and the pods get the new value on restart.
Step 4: Deploying the Infrastructure
Before running Terraform, you need to create an S3 bucket for the state file. The backend is configured in provider.tf:
backend "s3" { bucket = "devops-quiz-terraform-state" key = "dev/terraform.tfstate" region = "eu-west-2" encrypt = true use_lockfile = true}Create the bucket manually first, then:
cd terraformterraform initterraform applyThis will take about 15 to 20 minutes. Terraform creates the VPC, EKS cluster, RDS instance, ECR repositories, IAM roles for IRSA, and installs ArgoCD via Helm.
Once done, configure kubectl:
aws eks update-kubeconfig --name devops-quiz --region eu-west-2kubectl get nodesStep 5: CI/CD with GitHub Actions
The CI/CD pipeline uses OIDC to authenticate with AWS. No long-lived credentials stored in GitHub Secrets.
The GitOps Flow
This is my favourite part the whole deployment pipeline. Once it’s set up, deploying is just git push.
What happens:
- I push code to GitHub
- GitHub Actions kicks in builds the Docker images
- Trivy scans for vulnerabilities (fails the build if it finds CRITICAL issues)
- Images get pushed to ECR
- Actions updates the Kubernetes manifests with the new image tags
- ArgoCD notices the changes in Git
- ArgoCD syncs the changes to the cluster
No manual kubectl apply. No SSHing into servers. Just push code and watch it deploy.
The Workflow

The GitHub Actions workflow does the following:
- Checks out the code
- Authenticates with AWS using OIDC
- Builds the Docker images
- Runs Trivy vulnerability scanning (fails on CRITICAL vulnerabilities)
- Pushes to ECR if scans pass
- Updates the Kubernetes manifests with the new image tags
- Commits and pushes the changes
- name: Build frontend image run: | docker build -t $ECR_REGISTRY/$ECR_REPOSITORY_FRONTEND:$IMAGE_TAG ./frontend
- name: Run Trivy vulnerability scanner uses: aquasecurity/trivy-action@master with: image-ref: ${{ steps.login-ecr.outputs.registry }}/${{ env.ECR_REPOSITORY_FRONTEND }}:${{ github.sha }} exit-code: "1" severity: "CRITICAL"
- name: Push Frontend image to ECR if: success() run: | docker push $ECR_REGISTRY/$ECR_REPOSITORY_FRONTEND:$IMAGE_TAGThe last step updates the image tags in the Kubernetes manifests and commits them back to the repo:
- name: Update Kubernetes Manifests run: | # Update Frontend Manifest sed -i "s|image: .*$ECR_REPOSITORY_FRONTEND:.*|image: $ECR_REGISTRY/$ECR_REPOSITORY_FRONTEND:$IMAGE_TAG|g" k8s/apps/frontend.yaml
# Update Backend Manifest sed -i "s|image: .*$ECR_REPOSITORY_BACKEND:.*|image: $ECR_REGISTRY/$ECR_REPOSITORY_BACKEND:$IMAGE_TAG|g" k8s/apps/backend.yaml
# Update Migration Job Manifest sed -i "s|image: .*$ECR_REPOSITORY_BACKEND:.*|image: $ECR_REGISTRY/$ECR_REPOSITORY_BACKEND:$IMAGE_TAG|g" k8s/apps/migration-job.yaml
git add k8s/apps/frontend.yaml k8s/apps/backend.yaml k8s/apps/migration-job.yaml git commit -m "Update image tags to $IMAGE_TAG" git pushThis is the GitOps bit. ArgoCD watches the repo and syncs any changes to the cluster.
Step 6: Deploying with GitOps (The App of Apps Pattern)
After Terraform finishes, you have a running EKS cluster with ArgoCD installed. But ArgoCD doesn’t know what to manage yet. This is where the App of Apps pattern comes in.
The GitOps Architecture
Instead of manually applying Kubernetes manifests or having Terraform install Helm charts, everything flows through Git:
Terraform creates infrastructure and installs ArgoCD. One kubectl apply bootstraps the root Application. Root Application manages platform tools AND application workloads using sync waves.
The k8s/ Directory Structure
k8s/├── platform/ # Platform Applications (ArgoCD manages)│ ├── root.yaml # Bootstrap: kubectl apply -f this│ ├── alb-controller.yaml # ALB Controller Helm Application│ ├── external-secrets-chart.yaml # ESO Helm Application (wave -2)│ └── prometheus.yaml # Prometheus Helm Application│└── apps/ # Application workloads ├── namespace.yaml ├── configmap.yaml ├── external-secrets.yaml # ClusterSecretStore + ExternalSecrets ├── backend.yaml ├── frontend.yaml ├── migration-job.yaml └── ingress.yamlUnderstanding the Flow
1. Bootstrap with one kubectl command:
kubectl apply -f k8s/platform/root.yamlThis single command creates the root Application that manages everything else.
2. The root Application uses sync waves:
apiVersion: argoproj.io/v1alpha1kind: Applicationmetadata: name: external-secrets-chart annotations: argocd.argoproj.io/sync-wave: "-2" # Deploy first (provides CRDs)spec: source: repoURL: https://charts.external-secrets.io chart: external-secrets targetRevision: 2.0.0---apiVersion: argoproj.io/v1alpha1kind: Applicationmetadata: name: aws-load-balancer-controller annotations: argocd.argoproj.io/sync-wave: "-1" # Deploy after ESOspec: source: repoURL: https://aws.github.io/eks-charts chart: aws-load-balancer-controller targetRevision: 3.0.0---apiVersion: argoproj.io/v1alpha1kind: Applicationmetadata: name: 3-tier-app annotations: argocd.argoproj.io/sync-wave: "0" # Deploy after platformspec: source: repoURL: https://github.com/wegoagain-dev/3-tier-eks.git targetRevision: main path: k8s/appsWhy sync waves matter: Without them, the 3-tier app might try to deploy before the ALB Controller or External Secrets Operator are ready. This would cause failures - the Ingress can’t create an ALB if the controller isn’t running, and ExternalSecrets can’t be created if ESO CRDs aren’t installed yet.
With sync waves:
- Wave -2: External Secrets Operator deploys first (provides CRDs)
- Wave -1: ALB Controller and Prometheus deploy
- ArgoCD waits for them to be healthy
- Wave 0: Application workloads deploy after platform is ready
3. Resource-level sync waves within each app:
The k8s/apps/ directory also uses sync-waves to ensure correct ordering:
- Wave -2: Creates the namespace
- Wave -1: Sets up External Secrets and fetches from AWS
- Wave 0: Deploys backend, frontend, and runs migrations
- Wave 1: Creates the ALB ingress
Watch the Deployment
# Check all Applicationskubectl get applications -n argocd
# You should see:# NAME            SYNC STATUS   HEALTH STATUS# platform-tools  Synced        Healthy# 3-tier-app      Synced        Healthy
# Watch platform tools come up firstkubectl get pods -n kube-system -l app.kubernetes.io/name=aws-load-balancer-controllerkubectl get pods -n external-secretskubectl get pods -n monitoring
# Then watch your appkubectl get pods -n 3-tier-app-eks -w
# Check secrets were created by ESOkubectl get secrets -n 3-tier-app-ekskubectl get externalsecrets -n 3-tier-app-eks
Access the ArgoCD UI
kubectl port-forward svc/argocd-server -n argocd 8080:443Get the initial admin password:
kubectl get secret argocd-initial-admin-secret -n argocd -o jsonpath="{.data.password}" | base64 -dArgoCD Dashboard:
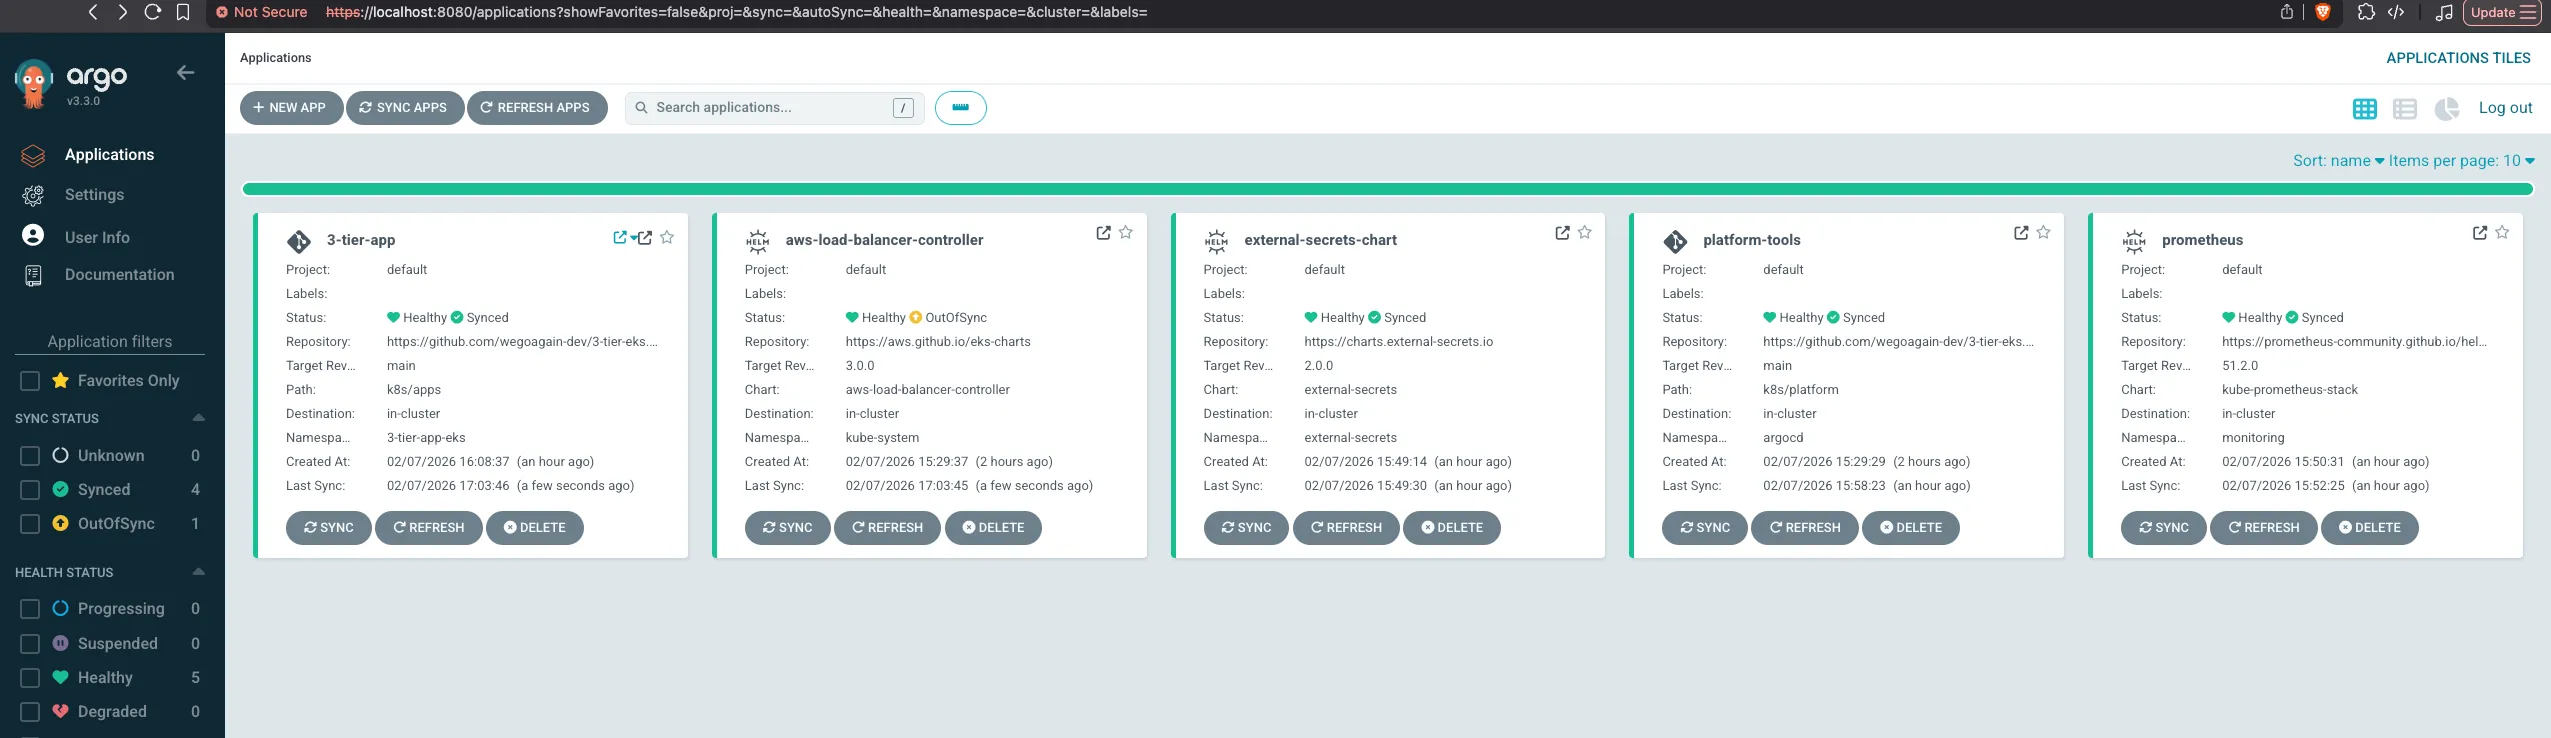
Testing the Deployment
Once ArgoCD shows “Healthy” and “Synced”:
# Access the app (get the ALB URL from the ADDRESS column)kubectl get ingress -n 3-tier-app-eks
# Test the appcurl http://<ALB-ADDRESS>/api/health/ready
# View logs if something is wrongkubectl logs -n 3-tier-app-eks -l app=backend --tail=50
Troubleshooting Sync Issues
If ArgoCD shows “OutOfSync”:
# Force a hard refreshkubectl patch application 3-tier-app -n argocd --type merge -p '{"metadata":{"annotations":{"argocd.argoproj.io/refresh":"hard"}}}'
# Check sync status detailskubectl get application 3-tier-app -n argocd -o yaml | grep -A 20 "operationState:"
# View ArgoCD logskubectl logs -n argocd -l app.kubernetes.io/name=argocd-application-controller --tail=100
Once everything is synced and healthy, you can access the application using the ALB URL from the ingress. Here’s a quick demo of the app in action:
Step 7: Monitoring with Prometheus and Grafana
The kube-prometheus-stack is installed via ArgoCD. Access Grafana:
kubectl port-forward svc/prometheus-grafana -n monitoring 3000:80Get the admin password:
kubectl get secret prometheus-grafana -n monitoring -o jsonpath="{.data.admin-password}" | base64 -dLogin with admin / the password from above.
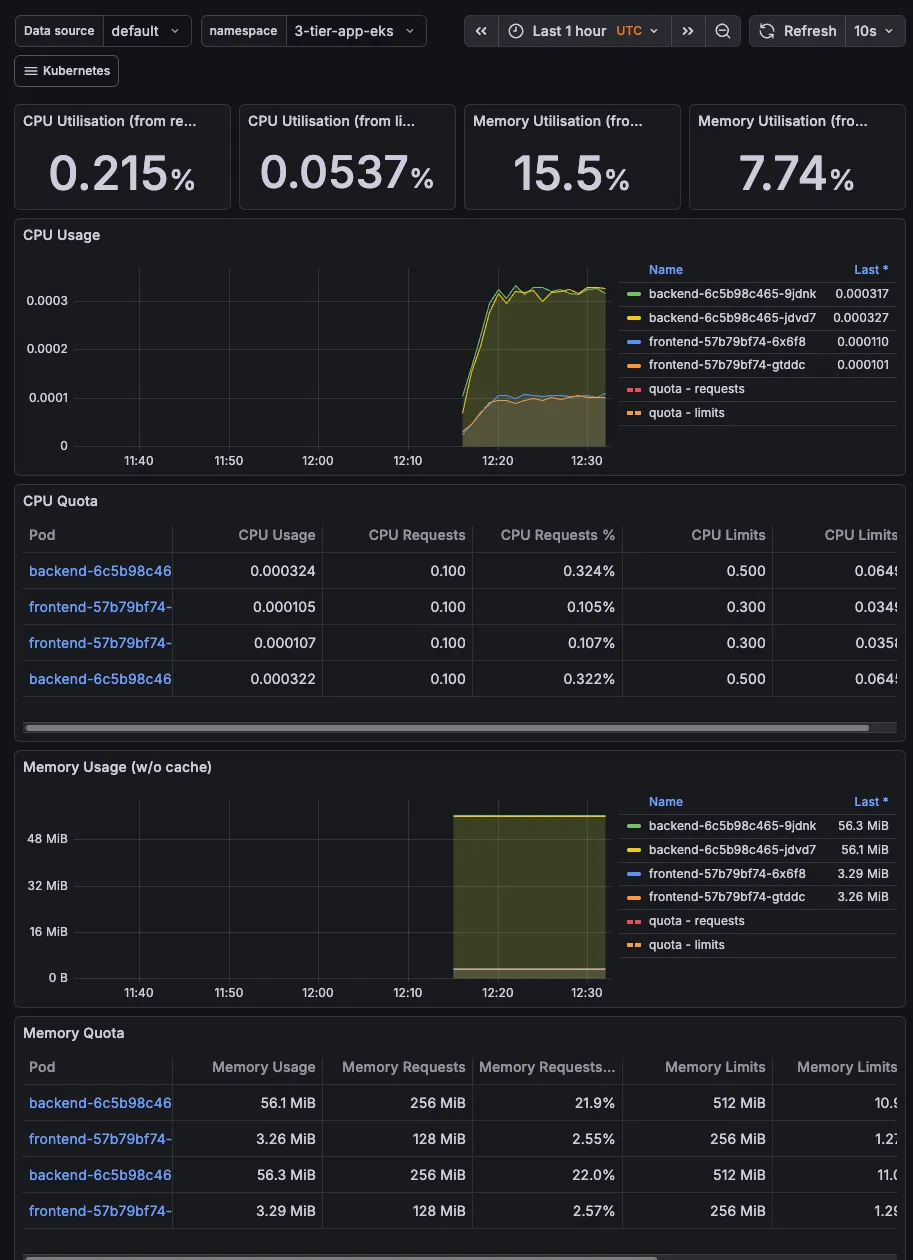
The stack comes with dashboards for cluster health, node metrics, and pod resource usage out of the box.
Grafana Dashboard:
Things That Broke (And How I Fixed Them)
Because nothing ever works first time, right?
Ingress stuck without an ADDRESS
Spent way too long on this. The AWS Load Balancer Controller needs the right IAM policy, and I was using a v2.7 policy while the Helm chart installed v3.0 of the controller. The fix? Always fetch the policy from the main branch so it matches your controller version:
data "http" "alb_controller_policy" { url = "https://raw.githubusercontent.com/kubernetes-sigs/aws-load-balancer-controller/main/docs/install/iam_policy.json"}Frontend showing “Connection Error”
Classic mistake. I hardcoded localhost:8000 in the React app during development. Worked fine on my machine! But in production, the frontend couldn’t reach the backend. Fixed it by using a relative path (/api) which the ALB ingress routes correctly.
Docker images built on M1 Mac wouldn’t run on EKS
Built the images on my Mac (ARM architecture) but EKS nodes are x86. The pods would crash with “exec format error”. Now I use docker buildx build --platform linux/amd64 to build for the right architecture.
Frontend health checks failing The nginx config was listening on port 8080, but the Kubernetes manifests had port 80 for the health probes. The probes kept failing with “connection refused” because they were hitting the wrong port. Fixed by updating the frontend deployment to use port 8080 everywhere:
ports: - containerPort: 8080readinessProbe: httpGet: path: / port: 8080service: ports: - port: 80 targetPort: 8080 # Route port 80 to 8080Migration job using wrong image tag
The CI pipeline updates image tags in the manifests, but the migration job was still using latest. This caused “ImagePullBackOff” errors because latest didn’t exist in ECR. Fixed by ensuring the CI pipeline also updates k8s/apps/migration-job.yaml with the same image tag as the backend.
ArgoCD sync stuck on immutable Job
Kubernetes Jobs are immutable. Once created, you can’t update them. ArgoCD would try to apply changes and fail with “field is immutable” errors. I initially tried Replace=true but that caused infinite recreation loops when combined with selfHeal: true. The proper solution is using a PostSync hook:
apiVersion: batch/v1kind: Jobmetadata: name: database-migration annotations: # Run as PostSync hook - executes after all other resources are synced # Deletes after success so it doesn't keep recreating argocd.argoproj.io/hook: PostSync argocd.argoproj.io/hook-delete-policy: HookSucceededThis runs the migration as a PostSync hook - it executes after all other resources are synced, then deletes itself on success. No more infinite loops.
Secrets not syncing from AWS Initially, I had Terraform creating Kubernetes secrets directly. This worked, but it meant secrets were in Terraform state and ArgoCD wasn’t managing them. Refactored to use External Secrets Operator (ESO) which syncs secrets from AWS Secrets Manager. Now secrets flow: AWS Secrets Manager → ESO → Kubernetes Secret, all managed by ArgoCD.
Helm repo cache errors Got errors like “no cached repo found” when running Terraform. Fixed by adding the Helm repos locally:
helm repo add eks https://aws.github.io/eks-chartshelm repo add argo https://argoproj.github.io/argo-helmhelm repo add external-secrets https://charts.external-secrets.iohelm repo add prometheus-community https://prometheus-community.github.io/helm-chartshelm repo updateRace conditions between platform and app Initially, I had separate kubectl commands for platform tools and the app. The app would sometimes fail because it tried to deploy before the ALB Controller or External Secrets Operator were ready. Fixed by using the App of Apps pattern with sync waves - ESO deploys first (wave -2) to provide CRDs, then ALB Controller and Prometheus (wave -1), then the app deploys after they’re healthy (wave 0).
CRD annotation too long error
Got this error when ArgoCD tried to apply the External Secrets Operator CRDs: metadata.annotations: Too long: must have at most 262144 bytes. This happens because ArgoCD’s client-side apply adds a last-applied-configuration annotation that exceeds Kubernetes’ limit for large CRDs. Fixed by adding ServerSideApply=true to the sync options:
syncOptions: - CreateNamespace=true - ServerSideApply=true # Fixes CRD annotation limitServer-side apply handles the apply logic on the Kubernetes server side without the large annotation.
Cleanup
Follow these steps in order to avoid orphaned resources:
Step 1: Delete the Ingress first (so the ALB gets cleaned up)
kubectl delete ingress three-tier-ingress -n 3-tier-app-eksWait a minute or two for the ALB to be deleted.
Step 2: Destroy Terraform resources
cd terraformterraform destroyThis deletes everything: EKS cluster, VPC, RDS, ECR repos, the lot.
What I’d Add Next
This works, but it’s not production-ready. Here’s what I’d tackle next:
Custom Domain & HTTPS
Right now I’m using the ALB’s auto-generated DNS name (something like k8s-3tierap-3tierap-1234567890.eu-west-2.elb.amazonaws.com). Not exactly user-friendly. Adding Route53 and ACM certificates would give me a proper domain with SSL.
Horizontal Pod Autoscaling (HPA) Currently the backend just runs with 2 replicas all the time. That’s fine until I get a traffic spike and the app crashes, or it’s 3am and I’m paying for capacity I’m not using. HPA would scale pods up when CPU hits 70% and scale down when things are quiet.
Network Policies Right now, any pod can talk to any other pod. That’s… not great from a security perspective. Network policies would lock this down. Only the backend pods can reach the database, only the frontend can reach the backend. If someone compromises the frontend, they can’t just hop to the database.
Resource Quotas & Limits Without quotas, one runaway pod could consume all the cluster’s CPU and memory. I’ve seen it happen. Setting namespace quotas and pod limits keeps things predictable.
Multi-AZ RDS The database is a single point of failure right now. If that availability zone goes down (rare but it happens), the whole app goes down. Multi-AZ RDS would automatically failover to a standby in another AZ.
What I Learned
Going through this project taught me a few things:
The App of Apps pattern with sync waves is the right way to do GitOps. Initially, I had Terraform installing Helm charts for ALB Controller, External Secrets, and Prometheus. It worked, but it was messy. Terraform would hang trying to connect to a cluster that wasn’t ready yet, and I had infrastructure concerns mixed with application deployment. Refactoring to the App of Apps pattern - where Terraform only creates infrastructure and ArgoCD, then a single kubectl apply bootstraps everything via a root Application with sync waves - made everything cleaner. Now Terraform finishes quickly, and GitOps drives the entire platform and application lifecycle with guaranteed ordering.
OIDC and IRSA are game-changers for security. Understanding the difference between GitHub OIDC (for CI/CD auth) and EKS OIDC (for pod auth via IRSA) was crucial. GitHub OIDC eliminates long-lived AWS credentials in GitHub Secrets. IRSA eliminates the need to give nodes broad IAM permissions. Both use short-lived tokens and the principle of least privilege. The key insight: OIDC is the authentication mechanism (proves identity), IRSA is the authorisation feature (proves what you’re allowed to do).
Separate concerns: Terraform creates IAM, GitOps creates pods. For IRSA to work, you need both the IAM role (Terraform’s job) and the ServiceAccount with the role annotation (GitOps’s job). The clean separation is: Terraform creates the role with the trust policy that references the OIDC provider, hardcodes the role ARN in GitOps manifests, then ArgoCD creates the ServiceAccounts and pods. This keeps infrastructure (IAM, OIDC providers) separate from workload configuration.
External Secrets Operator is the way to go for GitOps secrets. Storing secrets in Terraform state or Git is a bad idea. ESO bridges AWS Secrets Manager and Kubernetes seamlessly. The secret stays in AWS, ESO syncs it to Kubernetes using IRSA for authentication, and ArgoCD manages the ExternalSecret resource. Best of both worlds - security of AWS Secrets Manager, convenience of Kubernetes secrets.
Sync-waves are essential for ordered deployments. When you have resources that depend on each other (platform tools must be ready before apps, namespace must exist before deployments, secrets must exist before pods can mount them), sync-waves ensure they deploy in the right order. Without them, you’ll get random failures on first deploy. Application-level sync waves prevent race conditions between platform and apps. Resource-level sync waves ensure correct ordering within each application.
GitOps is worth the setup. Yeah, it took time to get ArgoCD working. But now deploying is just git push. I don’t have to remember kubectl commands or worry about which version is running where. The Git repo is the source of truth. The single kubectl apply -f k8s/platform/root.yaml bootstrap means anyone can deploy the entire stack after Terraform runs.
IRSA isn’t optional. I initially thought about just giving the nodes broad IAM permissions. That would’ve been a mistake. IRSA means each pod only gets the permissions it needs via its ServiceAccount. It’s more work upfront (creating IAM roles with trust policies) but way more secure. Plus, understanding the OIDC token flow is a great interview topic.
Cost surprises are real. That NAT Gateway cost caught me off guard. $32/month just so private subnets can reach the internet! Worth knowing about before you deploy.
Port mismatches are sneaky. The frontend nginx was listening on 8080, but I had port 80 in the Kubernetes manifests. Everything looked fine, but health checks kept failing. Always double-check your ports match between the container and the manifest.
Provider cleanup matters. I initially had kubernetes and http providers in Terraform that weren’t actually being used. Cleaning those up made the configuration clearer and reduced dependencies. Only include providers you’re actually using.
If you’re trying this yourself and get stuck, feel free to open an issue on the repo. I’ve probably hit the same problem.